
Inferno is a cornerstone of competitive Counter-Strike, defined by its tight corridors and distinct bombsites that demand precise team coordination. Its balanced design makes it a staple in matchmaking and professional tournaments, where control over chokepoints like Banana and Apartments decides rounds.
Winning on Inferno is less about raw aim and more about intelligent utility usage and clear communication. This guide provides the tactical framework required to master the map.
Understanding the Inferno Battlefield
Inferno's layout forces constant engagements and strategic sacrifices. The map is known for its narrow paths and numerous angles, rewarding teams who master grenade usage to clear space and block lines of sight. Unlike more open maps, Inferno pushes teams into direct confrontations at predictable locations, making utility and timing critical.
This trend is well-established. In CS:GO matchmaking from January to June 2022, Inferno had a global pick rate of approximately 20.7%, nearly identical to Dust2. This shows its staying power as a competitive staple, a legacy that has grown in CS2. More details on map popularity statistics here).
Each round on Inferno is determined by core objectives for each team, centered on controlling key map areas.
Inferno Core Objectives By Side
This table summarizes each side's focus for a successful round.
| Team Side | Primary Objective | Secondary Objective | Critical Map Area |
|---|---|---|---|
| Terrorist (T) | Execute a coordinated attack on a bombsite. | Gain map control to fake pushes and gather info. | Banana and Apartments |
| Counter-Terrorist (CT) | Hold bombsites and deny T-side map control. | Play for retakes by staying alive and using utility. | Banana and Top Mid |
Winning on Inferno requires a deep understanding of these goals. It involves knowing when to push, when to fall back, and how to use the map's layout to create an advantage.
Core Strategic Elements
To control Inferno, a player must understand its two bombsites and the paths leading to them. The A and B sites each present unique challenges that dictate round outcomes.
- The A Site: Accessible via Apartments or Short, A is a more open area with multiple defensive spots like Pit, Graveyard, and Library. A successful A-site take typically involves a split push and a blanket of smokes to cut off defenders.
- The B Site: This site is almost exclusively attacked through Banana, a tight, curved hallway that is the most contested area on the map. For any T-side B push, winning control of Banana is the primary step.
- Mid Control: While not a direct route, controlling Mid provides critical information, enables faster rotations, and allows teams to pressure either site to keep the CTs guessing.
Key Takeaway: Inferno is not a map for slow defaults; it is built for executes. To win consistently, teams need well-practiced grenade lineups and synchronized pushes, not reliance on individual plays.
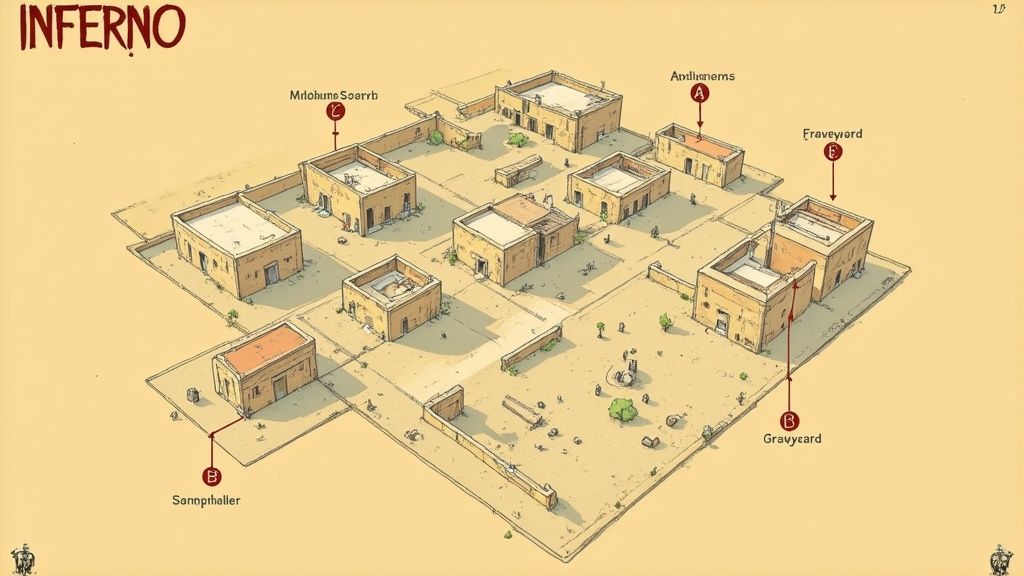
Essential Map Callouts
Inaccurate callouts lose games. Using standard, precise callouts enables your team to react instantly to enemy positions and set up effective defenses or retakes. Many players adjust their settings for better visibility in these tight angles; our guide to CS2 viewmodel commands covers this.
Players must know high-traffic areas like Banana, Top Mid, and Apartments (Apps). Within the sites, more specific callouts are essential—terms like Coffins and New Box on B, or Pit and Moto on A, are required for pinpointing enemy locations. Learning these terms is the first step to becoming a competent Inferno player.
Executing Effective Terrorist Side Strategies
A successful Terrorist side on Inferno relies on methodical, utility-driven executes. Both bombsites are fortified, and a coordinated barrage of smokes, flashes, and molotovs is necessary to breach them.
Correct utility usage slices through the defense, isolating players and creating a clear path for entry fraggers. Incorrect usage results in getting stuck in a chokepoint and donating rifles to the CTs for an easy round.
The philosophy of an Inferno T-side is pressure. Taking control of crucial map areas like Banana or Apartments forces the CTs to react. They will use their own utility, reposition, and provide the information needed to execute a surgical site take.
Dominating the B Site Through Banana Control
Every B site execute depends on control of Banana. This tight corridor is where the opening battle occurs, and winning it is non-negotiable for a successful bomb plant. The standard plan involves using utility to systematically push defenders off early, aggressive angles.
A coordinated effort is required to flush out the CT holding near the car or sandbags. This typically starts with a molotov from T spawn toward the car, followed by pop flashes to blind any re-peeking players. Once the squad has control of top Banana, the execute begins.
This requires smoking off two critical lines of sight:
- CT Spawn Smoke: This fundamental smoke blocks vision from the primary rotation path, preventing players from A or Mid from getting easy kills as the team enters the site.
- Coffins Smoke: This smoke isolates the player at Coffins, one of the most powerful defensive spots on the B site.
With these smokes deployed, entry fraggers can clear New Box and the Default plant spot. Support players should follow, layering in more flashes to keep any remaining defenders blind while securing the post-plant.
Methodical A Site Executions from Apartments
Taking A is a different challenge. It is a more complex, multi-layered attack that demands precise timing and a split push. While the main entry through Apartments (Apps) is a lethal chokepoint, it is the most direct route. A secondary push from Short or Arch is required to split the defenders' focus.
A typical A-site execute begins with the fight for Apartments. Players must meticulously clear Boiler and Bedroom before pushing onto the site. Once positioned at the top of Apps, utility can be used to neutralize the CTs' primary angles.
Crucial Insight: The success of an A-site take depends entirely on blocking vision from Pit and the CT rotation path. Failure to smoke off Moto and Library results in walking into a crossfire that is nearly impossible to survive.
Here is the essential utility checklist for a solid A-site execute:
- Moto/Truck Smoke: Thrown from Second Mid or the top of Apartments, this smoke is vital for cutting off the view from CTs rotating through Arch.
- Library Smoke: This blocks the deep A site position and the path from CT Spawn, effectively isolating the player in Pit or Graveyard.
- Pit Molotov: A well-aimed molotov forces the defender out of the strong Pit position, making them an easy target for players pushing from Short.
- Pop Flashes: Flashes tossed over the roof from Apartments will blind anyone on-site or in Graveyard, giving the entry team the time needed to enter.
Detailed smoke setups are critical on all maps. Learning key placements for other maps, as detailed in our guide on CS2 Mirage smokes, is equally important.
Adapting with Mid-Round Strategies
Running the same execute every round is predictable and easily countered. Real skill comes from reading the defense and adapting on the fly. This requires recognizing patterns in their positioning and utility usage and calling an audible.
A classic adaptation is the A-site fake. This involves throwing a full set of A-execute smokes and flashes from Second Mid and Apartments but committing zero players to the push. The goal is to trick the CTs into rotating from B, leaving that site open for a quick takeover through an empty Banana.
Another common audible is a late-round pivot through Mid. If initial pushes toward A or B stall, gaining Mid control can open up the round. A simple smoke at Top Mid allows the team to cross safely to Arch or push up towards Boiler, creating a pincer attack that can overwhelm the remaining defenders. These mid-round calls require a confident IGL and a responsive team.
Nailing Your CT Side Defense
A strong CT side on Inferno relies on two factors: stubborn site holds that drain the T-side clock, and sharp, coordinated retakes. Winning on defense is about discipline, smart grenade usage, and knowing the map’s key angles. The job is to make the terrorists pay for every step they take.
Holding a site involves more than just aiming. It requires setting up effective crossfires, stalling pushes with perfectly timed utility, and providing constant, clear information to teammates. Whether anchoring a site or rotating between them, individual plays can dismantle an enemy execute before it begins.
Choosing Your Defensive Formation
The team’s defensive setup is the blueprint for the round. The two most common formations on Inferno are the classic 2-1-2 and the B-heavy 3-2 setup. Each has distinct strengths and is suited for different reads on the enemy.
The 2-1-2 setup is the standard. Two players are on A, one controls Mid, and two hold B. This provides solid map coverage, prevents rushes, and allows for quick rotations to support either site. For most teams, this is the default and most flexible formation.
The 3-2 setup strengthens the B defense. Stacking three players to control Banana is an effective counter against teams that frequently rush B. That third player can push for information, throw extra support grenades, or create an unbreakable crossfire. The trade-off is that the A site becomes more vulnerable to a fast, coordinated attack.
Pro Tip: Do not default to the 3-2 B stack. It is a strategic counter, not a standard setup. Use it when you are certain the enemy is overcommitting to Banana, then switch back to a 2-1-2 to remain unpredictable.
Locking Down the B Bombsite
Holding B is a war of attrition, with Banana as the battlefield. The main goal is to delay the T-side push as long as possible, forcing them to use their utility before they see the site. A solid B hold starts with early utility from players at New Box or Garden.
An effective play is to throw an early-round molotov or incendiary to stop the initial Banana rush. This does more than deal damage; it stalls their momentum and buys time for teammates to rotate. Follow it up with HE grenades and pop-flashes to punish anyone pushing through the fire.
B Site Holds: Utility and Angles
- New Box: This position is optimal. It provides good cover and a perfect line of sight on the Banana exit. A player here can throw a deep molotov and use flashes to support a teammate playing closer.
- Coffins: Anchoring from Coffins provides a powerful defensive angle. It is difficult for Ts to clear and is ideal for a crossfire with a teammate at New Box or on-site.
- Garden/CT: From here, a player can throw crucial support flashes over the wall into Banana, blinding attackers without peeking. This spot is also the main pivot for retakes.
A well-played B hold leaves the Ts with two poor options: force a costly execute with no utility left, or rotate away and waste a significant portion of the round.
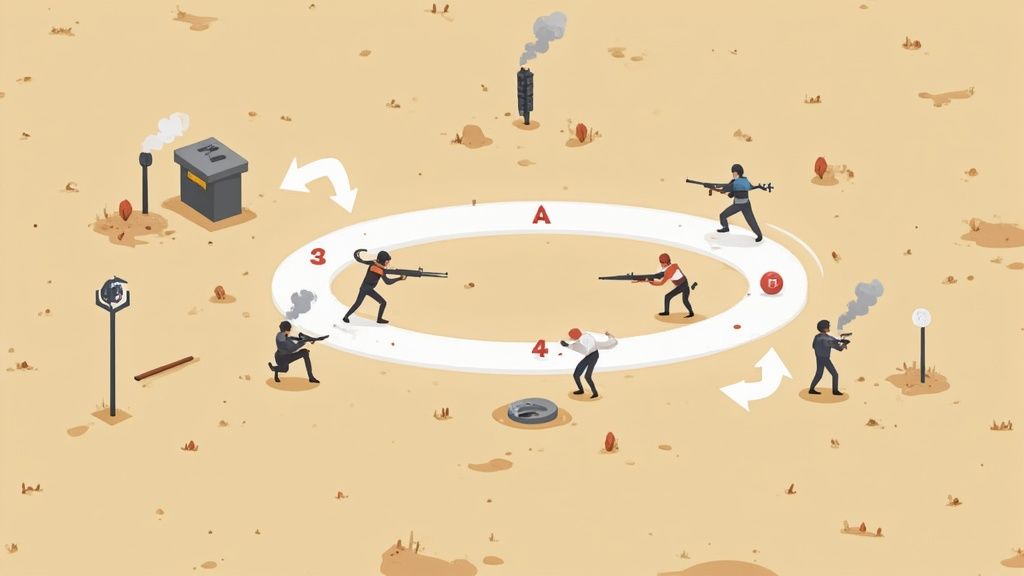
Setting Up Crossfires on A Site
Defending A requires controlling multiple angles and creating deadly crossfires. Unlike B's single chokepoint, A can be attacked from Apartments and Short simultaneously. Defenders must work together to cover every entry point without being isolated.
The most reliable A defense is a crossfire between a player in Pit and another near Graveyard or Moto. This setup ensures that any T pushing out of Apps or Short is engaged from at least two different angles. The on-site player should also use a smoke to block off Apartments, forcing attackers into the open or slowing them down.
The Apartments player has a critical role. They need to gather early information, slow down the push with a molotov at Boiler, and then fall back to a safe position to support the players on site. A fast, aggressive Apartments push can be decisive if the CT player is caught unprepared.
How to Execute a Coordinated Retake
Even the best defense can break. Once the bomb is planted, the mindset must shift from holding ground to retaking it. A successful retake is a structured plan using precise utility to clear common post-plant positions, not a chaotic scramble.
For a B site retake, the first step is to isolate the site. A smoke for the Banana exit is essential to prevent a lurker from attacking from behind. Simultaneously, someone from CT spawn should smoke off New Box to block that line of sight. With vision denied, the team can use flashes to move in and clear hiding spots like First Oranges, Default, and Coffins. A molotov is almost always needed for the Dark spot behind the pillar to force out the last hidden player.
An A site retake is typically trickier due to the numerous angles. Start by smoking off Apartments to block vision. Next, use molotovs to clear Pit and the default plant spot behind the truck. Flashes thrown from Arch or Library can blind any Ts holding on-site. The key is to coordinate entry from both CT spawn and Library, catching remaining defenders in a pincer move.
For the best trading platforms with verified security, see our best CS2 trading sites.
Mastering these defensive holds and retake strategies will transform your team from a reactive unit into a proactive force, prepared to shut down any attack on the Inferno CS GO map.
Advanced Utility Usage And Key Lineups
Knowing the layout of Inferno is fundamental, but mastering its utility is what separates ranks. Consistent wins require more than knowing callouts; they demand precise, repeatable grenade throws that can decide rounds before a shot is fired.
A single perfect smoke can neutralize an AWP angle, while a well-timed pop-flash can open up a site. These are not just tricks; they are the building blocks of every successful execute and retake on this map. Here are the essential lineups you need to know.
Essential T-Side Execute Grenades
When pushing a site as a Terrorist, utility must block vision and create chaos. The approach needs to be fast, coordinated, and overwhelming.
One of the most crucial starting smokes for a B-site take is the Deep Banana smoke from T Spawn. This throw lands near the car, giving your team a safe corridor to push up Banana and challenge CTs without being picked off early. It is the cornerstone of establishing control and preventing an early CT advantage.
For the A-site, the execute from Second Mid is standard. From this position, you can land smokes on both Moto and Library. These two smokes are highly effective, completely cutting off the site from CT Spawn and Arch-side rotators. This isolates the on-site players, allowing your team to focus on clearing Pit and Graveyard without worrying about reinforcements.
Critical CT-Side Utility Holds
On the CT side, utility is for delay, information, and setting up crossfires. The goal is to make the T-side pay for every inch of ground they take.
A valuable piece of utility is the B-site retake flash thrown from Construction. By aiming high over the B-site wall, you can pop flashes that blind anyone holding a post-plant position. This allows teammates to swing out and clear default, First Oranges, and other common spots without facing a set defense.
Counter-utility is also a fundamental skill. Smoking off a molotov, especially in Banana, can instantly neutralize a dangerous situation, turning a death trap into a screen to push through. For more on game mechanics, you can find useful Counter-Strike codes in our guide.
Understanding Defensive Flow
A solid CT defense is a process. It begins with delaying the push, then establishing crossfires, and finally, executing a coordinated retake if the site is lost.
This flowchart breaks down the essential phases of a B-site defense.
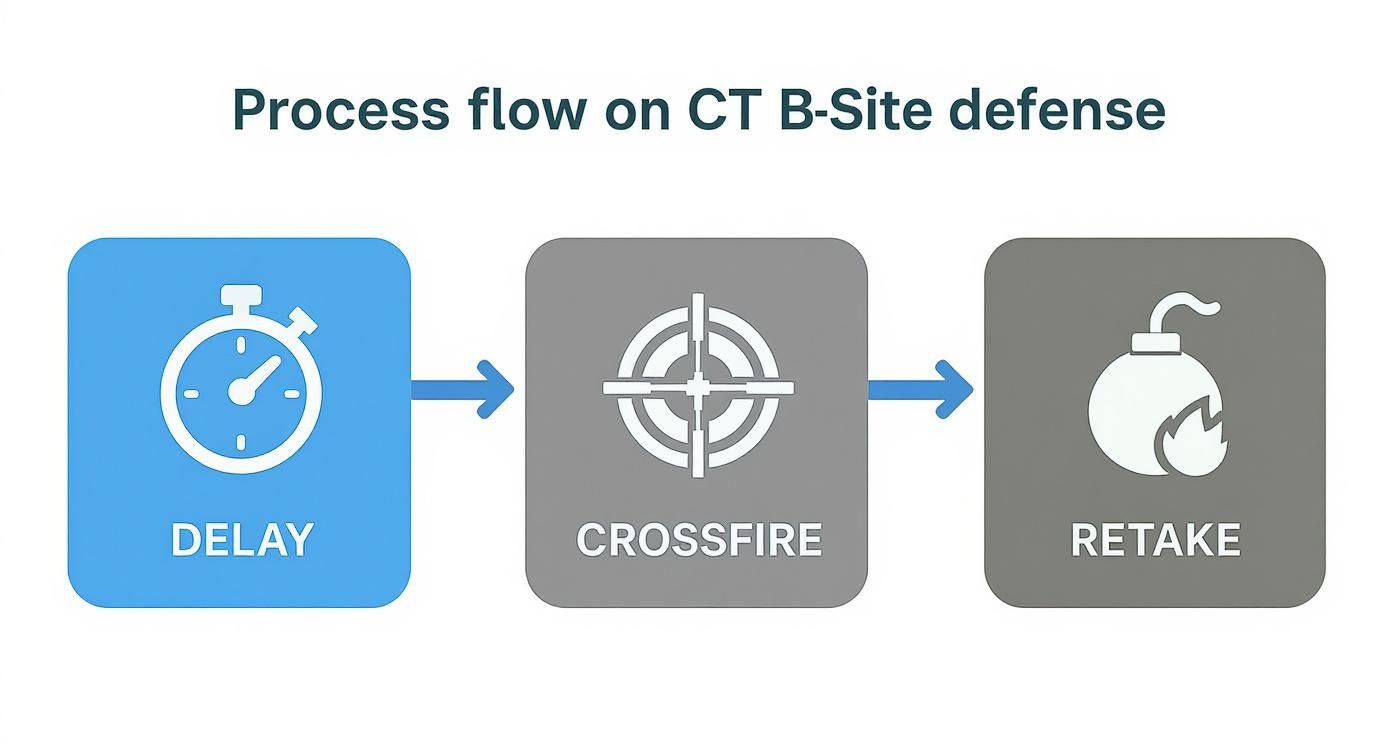
It illustrates how initial utility is used to slow the T-side advance, providing time to establish strong crossfire positions. If the bomb is planted, the focus shifts to a structured retake.
Key Insight: Hesitation during a retake is fatal. The moment the decision is made to go, the entire team must commit. Waiting too long allows the T-side to settle into their post-plant positions, making the site nearly impossible to reclaim.
Essential Inferno Grenade Lineups
To solidify your Inferno gameplay, you need a firm grasp of key utility throws. This table outlines some of the most impactful grenades for both T and CT sides.
| Grenade Type | Purpose | Throw Location | Impact Area |
|---|---|---|---|
| Smoke | Block CT vision from Banana | T Spawn (Top of Mid) | Deep Banana (Near Car) |
| Smoke | Isolate A-Site from rotators | T-Side Second Mid | Moto / Truck |
| Smoke | Isolate A-Site from rotators | T-Side Second Mid | Library |
| Molotov | Clear out Sandwich position | Top of Banana | B-Site Sandwich/Grill |
| Flashbang | Blind post-plant positions | CT Construction | Over B-Site Wall |
| Smoke | Extinguish T molotovs | CT Banana (Coffins) | Banana Chokepoint |
Mastering these throws allows your team to control engagements, isolate opponents, and execute strategies with higher precision. Practice them in an empty server until they are flawless.
Inferno's meta is constantly evolving, especially with CS2's updates. At IEM Cologne 2023, Inferno was the most picked map (23 times) and favored the attackers with a 52.3% T-side win rate. This is a significant shift from its historically CT-sided reputation, largely due to CS2's more dynamic smoke physics.
This data indicates that mastering offensive utility is more important than ever. The way smokes now fill entire spaces makes old, pixel-perfect CT holds less reliable. For Terrorists, this means well-practiced smoke executes are more effective at taking over a bombsite.
Winning Rounds with Superior Tactics
Set plays and rehearsed executes are effective, but rounds on Inferno are often decided in the mid-round. This is where tactical adjustments, smart economic reads, and punishing enemy habits determine the outcome.
To win consistently, you must learn to direct the flow of the round, spot openings created by enemy rotations, and capitalize on them before the defense can react.
Mid-Round Calling and Lurking
Good mid-round calls depend on timing and information. A patient lurker in key areas like Alt Mid or Arch can be invaluable. A quiet lurker can pick up sound cues—like footsteps rotating from A to B—giving the IGL the signal to pivot and hit the now-vulnerable A site. The lurker’s information is critical, but only if communicated clearly and quickly.
As a CT, you must recognize a stalled T-side push. If Banana goes silent after the initial utility, it could be a fake. This is a cue to make a proactive call, such as pushing for information or rotating a player to a more aggressive position. Do not just sit back and let them dictate the pace; disrupt their plan and regain control.
Economic Management on Inferno
Inferno’s tight corridors make force-buys exceptionally risky yet potentially rewarding. A well-timed force-buy is a calculated assault based on map control and surprise. If CTs secure Banana control early, a force-buy with SMGs and upgraded pistols can defeat a T-side with full rifles expecting a passive hold.
Force-buys must be strategic. Assess the enemy's economy. If they are also on a weak buy, the chances of success increase. Repeatedly forcing up after losing multiple rounds is a poor strategy that bleeds cash and funds the enemy team.
Many A-site executes fail because teams use all their utility at once. Throwing smokes and flashes without confirming teammate positioning creates a disorganized push that defenders can easily dismantle. Stagger utility to maintain pressure and adapt as the situation develops.
Correcting Common Tactical Mistakes
Many rounds on Inferno are lost to the same repeated mistakes. Identifying these patterns in your own gameplay is the first step toward improvement.
Common Mistakes to Avoid:
- Over-peeking Banana as CT: An aggressive CT who dry-peeks Banana and dies in the first 15 seconds instantly puts their team at a 4v5 disadvantage. Use utility to gain information instead of giving them an opening kill.
- Forgetting to Clear 'Dark' Post-Plant: After planting the bomb on B, teams often fail to clear the 'Dark' spot behind the pillar. One CT hiding there can clutch the round. Always clear your corners.
- Wasting A-Site Execute Utility: Throwing smokes for Moto and Library when teammates are not in position is a significant waste. It telegraphs the plan and gives CTs ample time to prepare. Coordinate throws with your push.
Inferno holds the record as the most played map in Counter-Strike Major grand finals, with 263 appearances. To learn more, you can explore its competitive history in CS:GO and CS2. This history proves the importance of mastering the map's tactical layers.
Common Questions About Inferno
Here are the answers to the most common tactical questions players face on this iconic map, based on the current meta.
Is Inferno T-Sided or CT-Sided in CS2?
Historically, Inferno was considered a CT-sided map due to its narrow chokepoints. This is no longer the case. Statistics from recent professional tournaments, such as IEM Cologne 2023, show a T-side win rate of 52.3%. This shift suggests Inferno is either balanced or slightly T-sided in the current meta, largely because CS2's dynamic smokes are more effective for executing site takes.
What Is the Most Important Area to Control on Inferno?
The most critical area to control is Banana. For the T-side, taking Banana is the primary route to the B site and applies immense pressure on the CT setup. For CTs, failure to hold or retake Banana often leads to being overwhelmed. Losing control of Banana early in the round significantly decreases the chance of winning.
How Do You Effectively Attack the A Site on Inferno?
An effective A-site attack relies on coordinated utility to neutralize common defensive positions. A standard A execute involves smoking off Moto and Library to cut off sightlines from CT spawn and Pit. Flashes thrown over the roof from Second Mid or Apartments are also needed to blind on-site players. A split push from both Apartments and Short is the most effective way to attack, engaging defenders from multiple directions simultaneously.
What Is the Biggest Mistake Players Make on Inferno?
For CTs, the biggest mistake is unnecessary aggression. Many rounds are lost because a player dry-peeks Banana without a flash or pushes through a smoke without information. This provides the T-side with an easy opening pick and a significant advantage. For Ts, the most common mistake is a sloppy post-plant, failing to clear hiding spots like Dark on B or under the Balcony on A, which often results in a lost round.
How Should CTs Defend Banana?
A smart Banana defense is built on delay and damage, not risky aim duels. Use an early incendiary or molotov to stop the initial T rush, forcing them to use utility to extinguish the fire. Follow up with HE grenades and well-timed pop-flashes from safer positions like New Box or Garden. The objective is not to secure multiple kills but to make the T-side's push as costly and time-consuming as possible.


